

Send Professional Invoices Directly from Your Website
HDInvoice is my brand-new WordPress Invoicing and Payment plugin, and has been several years in the making. It was designed from the ground up to make invoicing your customers and getting paid as simple and convenient as possible.

Why Use HDInvoice?
HDInvoice is amazingly simple to use, but extraordinarily powerful in capabilities (as you’ll see as this article goes on). But if you just want the elevator pitch on what HDInvoice can do, then the following should give you a great idea of what to expect.
- Easy, fast, intuitive
- Powerful tools built-in
- Invoice import and exporter
- Accounting tool to automatically see amounts of invoices, amounts paid, taxes, and even transaction fee totals
Stunning dashboard to get a bird’s eye view
- Automatic email notifications
- Integration with Stripe, PayPal, and Square
- Stripe integration also allows for Google Wallet and Apple Pay
- Recurring invoices
- If using Stripe, “Child” invoices can be autocharged
- Fully located on your own site/domain. No need to send invoices to your customers through a third party!
- Best in class support. Just look at my support record on WordPress.org and here on HDPlugins. Literally thousands of happy users!
How to Install and Activate
After you have purchased this plugin, an email will be sent to you with your activation license as well as a download link. Please remember to check your spam folder if you have not received this email.
- Log into your site and from the admin menu, select Plugins then the Add New button (found near the top of the page)
- Now select Upload Plugin and select the plugin you downloaded, then Install Now.
- Once the plugin has been installed, select the Activate Plugin button
Now that the plugin is on your site, a new navigation item will appear in your admin menu called HDInvoice. Selecting this will redirect you to the HDInvoice settings page, where you can enter your license. Once your license has been activated, you can continue filling out the mandatory fields on the settings page, and begin creating invoices!
HDInvoice is compatible with all WordPress versions above 5.6, and is compatible with PHP 7.2+ and PHP8!
Getting Started
The first thing to know about HDInvoice is how things are connected, at a basic level. How do you use HDInvoice?
From your WordPress admin, select HDInvoice from the admin menu, or go to yourdomain.com/hdinvoice to be taken directly to a login page.
- Fill out the settings page. A lot of these settings are used through all of your invoices.
- Create a new customer. All invoices are attached to a customer, so you need to have a customer created before creating an invoice.
- From the customer page, create a new invoice
HDInvoice Settings Page
The HDInvoice settings page contains 6 Tabs/Pages.
- Global ⇾ Settings that affect all invoices
- Company ⇾ Provide information about you
- Payments ⇾ eCommerce
- Notifications ⇾ Emails
- Designer ⇾ Customize
- Advanced ⇾ Extra features or troubleshooting
The ONLY mandatory fields are the Invoice Currency, Company Name, and Company Email fields.
Settings — Global
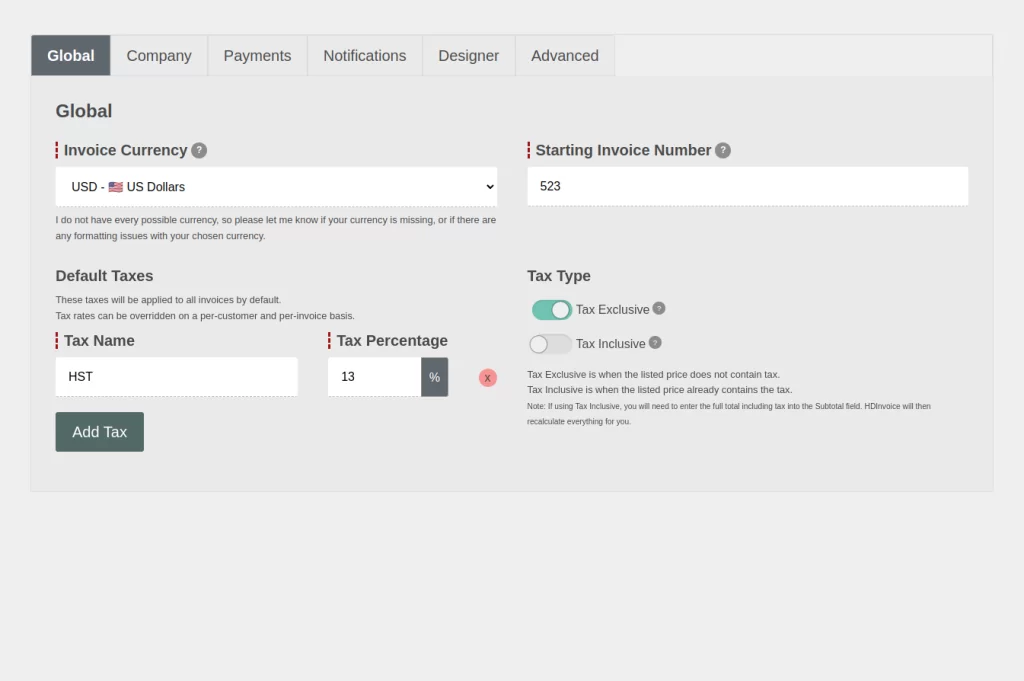
The Global tab is where your main default settings that affect all invoices are located. Just note that Taxes can be overridden for each customer and each invoice if needed.
Invoice Currency
The Invoice Currency is the currency that you invoice in. This alters both the way that currency values are displayed (example, $99.99 in the United States, 99.99 $ in Quebec, or ₱ 99.99 for the Philippine Peso), and the currency that your Payment Gateway will charge in.
Starting Invoice Number
The Invoice Number is a (preferably) unique number attached to each invoice to be used as an easy identifier for both you and your customers. HDInvoice increases this number by one every time you create a new invoice.
If you are coming from a different invoicing system that also uses integers as Invoice Numbers or IDs, then you can enter the needed value here. You can also set this to a relatively high number such as 1348 to make it looks like you’ve created more invoices than you really have. I promise I won’t tell!
Note: as of now, the Invoice Number HAS to be an integer. In the future I will create a way to allow for custom functions to override this so that you can make your INs more unique by, for example, prepending them with your company initials.
Default Taxes
Default Taxes will be automatically applied to all future created invoices, unless that customer has custom taxes.
Each Tax consists of a Tax Name, and a Tax Percentage. HDInvoice is not compatible with compound taxes (IE: tax a tax).
Tax Type
The way you might display item and purchase totals differs depending on your culture and location in the world. Some places are Tax Exclusive, while others are Tax Inclusive.
For example, here in North America, we do not include tax in the listed price of products. So a $100 product is really $100 + tax. This is called Tax Exclusive. While in many places in Europe, if something is listed for €100, that price already includes that tax, and so is Tax Inclusive.
The main difference between these two settings, is that if you enable Tax Inclusive, then when entering the Subtotal, you should also include the taxes. HDInvoice will automatically recalculate the subtotal and taxes for you. If you do not want this behaviour, please use Tax Exclusive instead. This will not affect the final result of the invoice, just how you prefer to enter the data.
Settings — Company
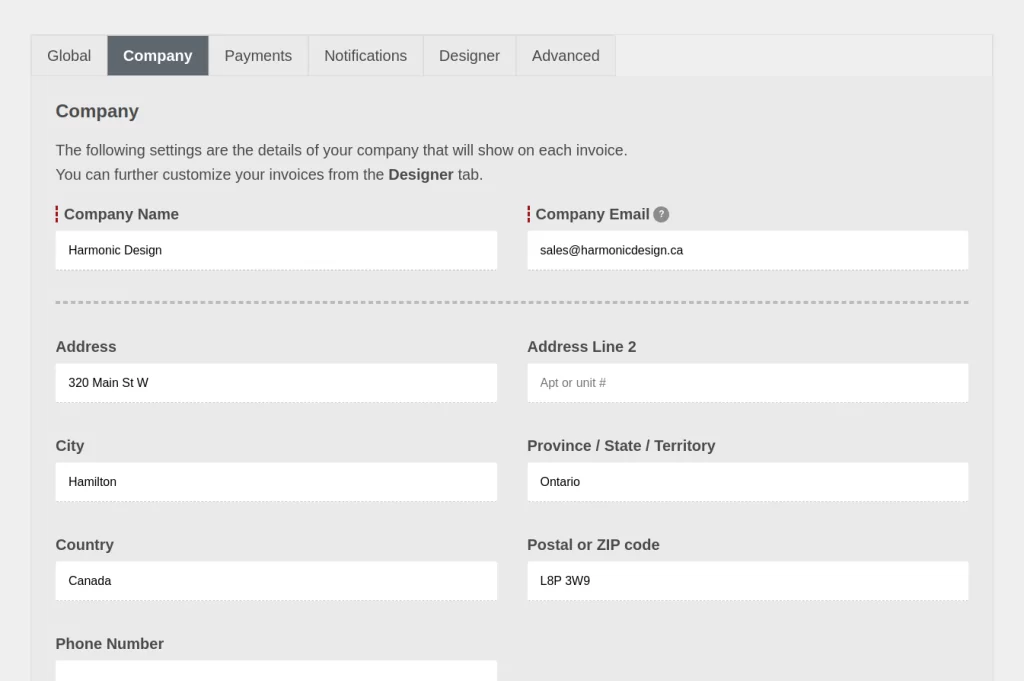
The company tab is where you can enter all the information you want about you or your company. The only mandatory fields are Company Name and Company Email.
Filling out the rest of the information allows HDInvoice to also include that data on the invoices themselves. So although not mandatory, I still strongly recommend filling it out as it will be a better experience for your customers and make the invoices feel more professional.
Settings — Payments
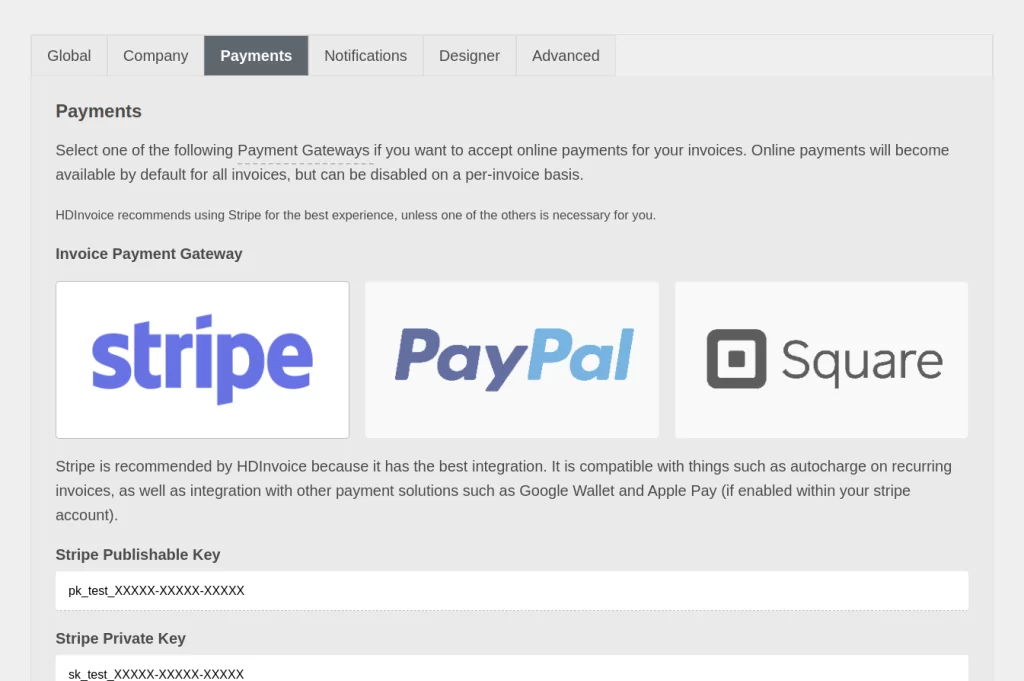
The payments tab is where you can set up your Payment Gateway if you want your users to be able to pay their invoices directly. HDInvoice is currently compatible with three Payment Gateways: Stripe, PayPal, Square.
You can select any of the available gateways to see what mandatory fields are required by that gateway.
NOTE: Although compatible with three, I strongly recommend using Stripe. To be blunt, their APIs are world-class, allowing for a FAR better integration and overall experience with them than the others. Stripe integration also allows for Google Wallet and Apple Pay (if you enable in your Stripe Account).
Settings — Notifications
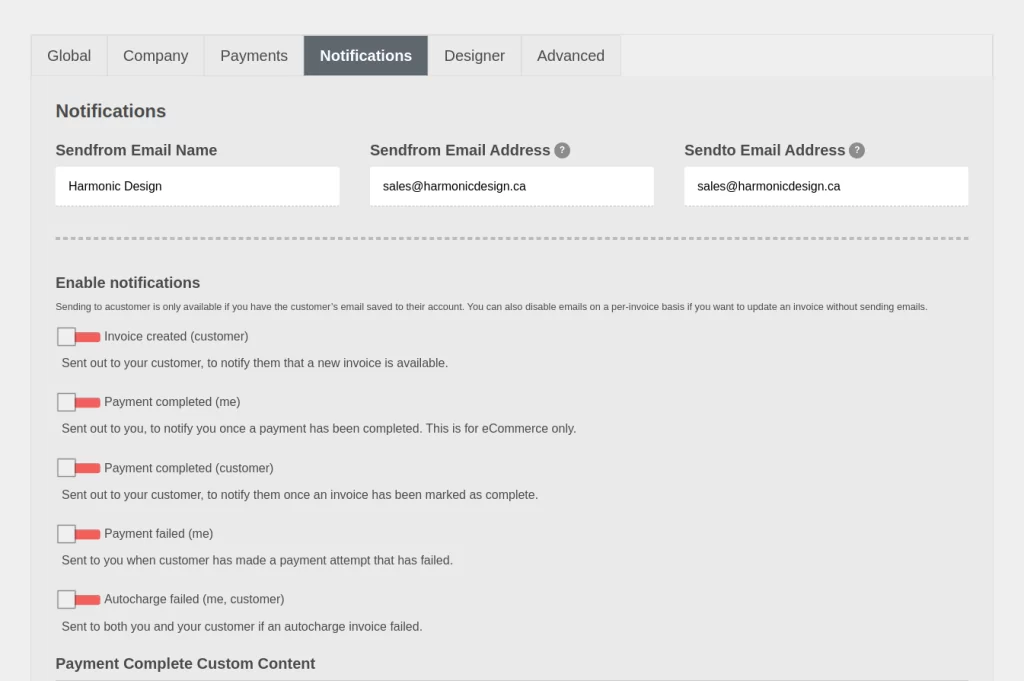
The notifications tab contains options for sending emails during certain events. Sending notifications to your customers is only possible if a) the relevant notification is enabled, and B) you have added their email address to their profile.
Please note that I can only do so little to help diagnose email sending issues. It is your responsibility to ensure that your site and DNS is properly setup. I recommend using the free WP Mail SMTP plugin to help.
Sendfrom Email Name
This field represents the Sent-from field header in emails. I recommend changing this to your company name so that any emails HDInvoice sends will be from your name.
Sendfrom Email Address
This field is the email address that HDInvoice will use to send emails from. Please ensure that whatever address you use here is the same domain as the site you are using HDInvoice on. Not doing so can increase the likelihood that your emails will end up in spam.
Sendto Email Address
This is the email address that HDInvoice will send notifications to you.
Enable notifications
This is a list of currently available notifications that HDInvoice can send. Each notification declares if the notification is set to you or your customer. The basics are “Invoice Created”, “Payment Completed”, and “Payment Failed”.
Payment Complete Custom Content
If you want, you can use this field to add custom content to the Payment Completed email. This is especially useful if you want to add a “thank you” message to the emails, or provide any additional followup details such as a download link.
Settings — Designer
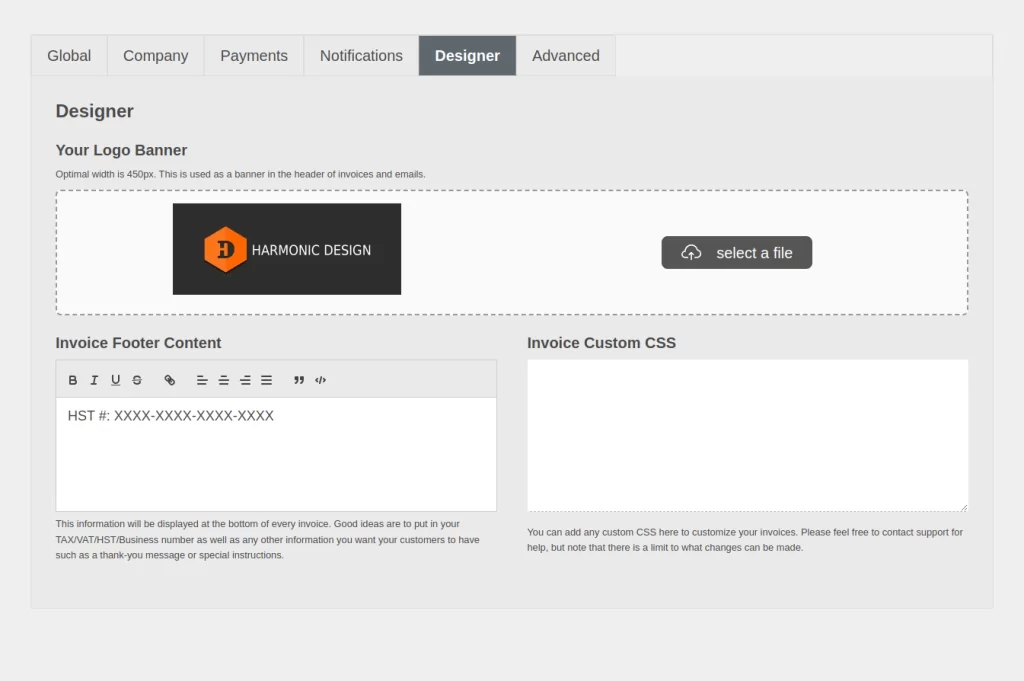
The designer tab is where you can customize the appearance and style of your invoices.
Your Logo Banner
You can upload a banner that will appear at the top of all your invoices and emails. The recommend width is 450px wide as it needs to be able to span the width of your invoices.
Invoice Footer Content
This content will appear at the bottom of your invoices. You can place any content you want here, such as special instructions, tax numbers, or just a thank-you message.
Invoice Custom CSS
I personally think that HDInvoice makes some very good-looking invoices. But maybe you disagree, or otherwise want to customize the style of the invoices. Well, any CSS you add here will be added to all invoices.
Settings — Advanced
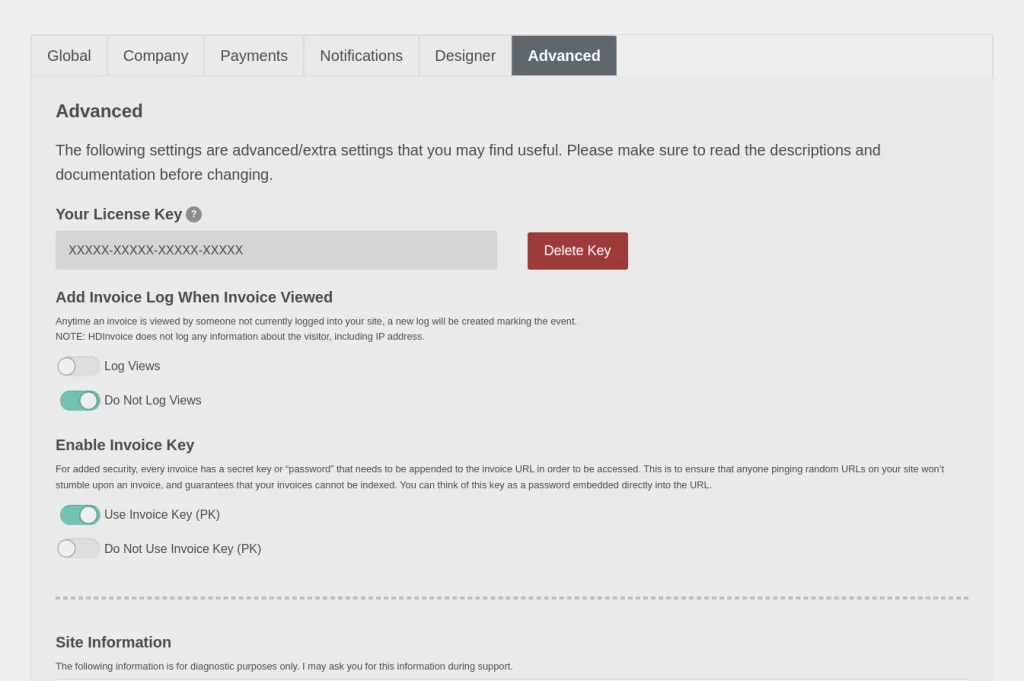
I expect this tab to grow as HDInvoice grows, but the idea of these settings is that most users will not need to change these, but are here if needed.
Add Invoice Log When Invoice Viewed
HDInvoice makes logs of certain events, such as invoice creation, when totals or amount paid changes, etc. It does not, however, log when your customer views an invoice.
Enabling this will first check to see if the current user is logged in, and if they are not, adds a log to the invoice. The log does not contain any user information such as IP address. The idea is that if your customer claims that they have not seen the invoice, you can tell them, “Really? Because I have a view logged yesterday at 1:34pm”.
Enable Invoice Key
This is enabled by default, and forces invoices to only be viewable if a public key is present in the invoice URL. The key looks like ?pk=xxxxxx added to the end of all invoice URLs, with xxxxxx being a representation of a password.
This is a great feature for security as it helps ensure that even if someone knows you are using HDInvoice, and starts pinging random URLs on your site in hopes of stumbling upon an invoice, they will get nothing without also knowing the public key. It also acts as assurance against search engines from indexing your invoices in case your site is not properly configured for SEO and sitemaps.
You should only disable this feature if your users are having trouble accessing your invoices for whatever reason.
Site Information
This field is not something you can change or edit, but is instead a useful tool for helping me diagnose any issues during support. This field will display the following information.
- WordPress version
- HDInvoice version
- PHP version
- WordPress memory size
- Site language
- and a list of Active Plugins (useful if one of your plugins is causing issues with HDInvoice)
Customers Add or Edit Page
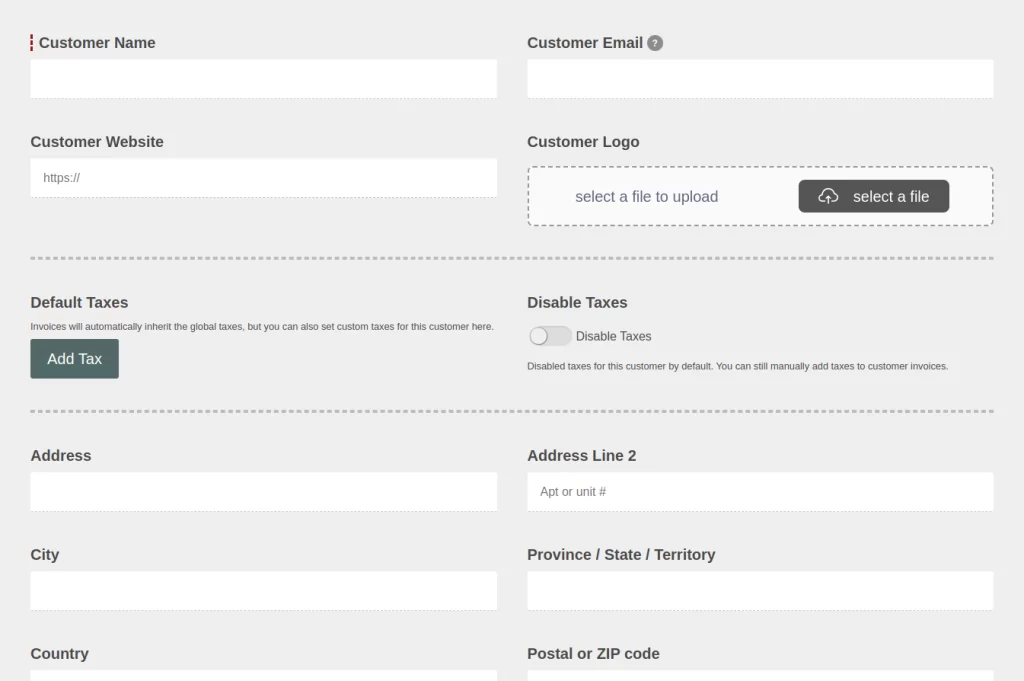
The Add or Edit Customer page is pretty straight forward and simple by design. The last thing I want is to force you to fill out a ton of unnecessary information. This is why the only mandatory field is Customer Name.
Customer Fields
Although only Customer Name is required, it is still best practice to fill out what you can. I’ll ignore the generic fields and only focus on the special fields. The address information will be automatically added to invoices.
Customer Email
The email address of your customer. This is required if you want to automatically send notifications such as Invoice Created or Payment Completed.
Customer Default Taxes
Just like with the Default Taxes on the settings page, you can add Default Taxes to your customer. If in use, new invoices will inherit the taxes from your customer instead of the ones in the settings page. This is useful for clients in a different region that may be taxed at a different rate.
Disable Taxes
If enabled, taxes will be set to empty by default for all future invoices for this customer.
Extra Information
Any information you add here will be visible to you only. You can use this to keep any private notes about this customer, such as your overall thoughts about working with them, or perhaps who the best contact is at this company for future reference.
Invoice Add or Edit Page
The add or edit an invoice page is where you will be spending most of your time. Invoices are best viewed from the Customer page or the Invoices page.
The Add/Edit Invoice page contains 5 Tabs/Pages.
- Main ⇾ Main invoice data such as totals and line items
- Taxes ⇾ Invoice taxes
- Notes ⇾ Custom notes and Invoice Logs
- Recurring ⇾ Automatically duplicate invoices
- Options ⇾ Advanced options or features
The ONLY mandatory field is Invoice Subtotal.
Invoice — Main
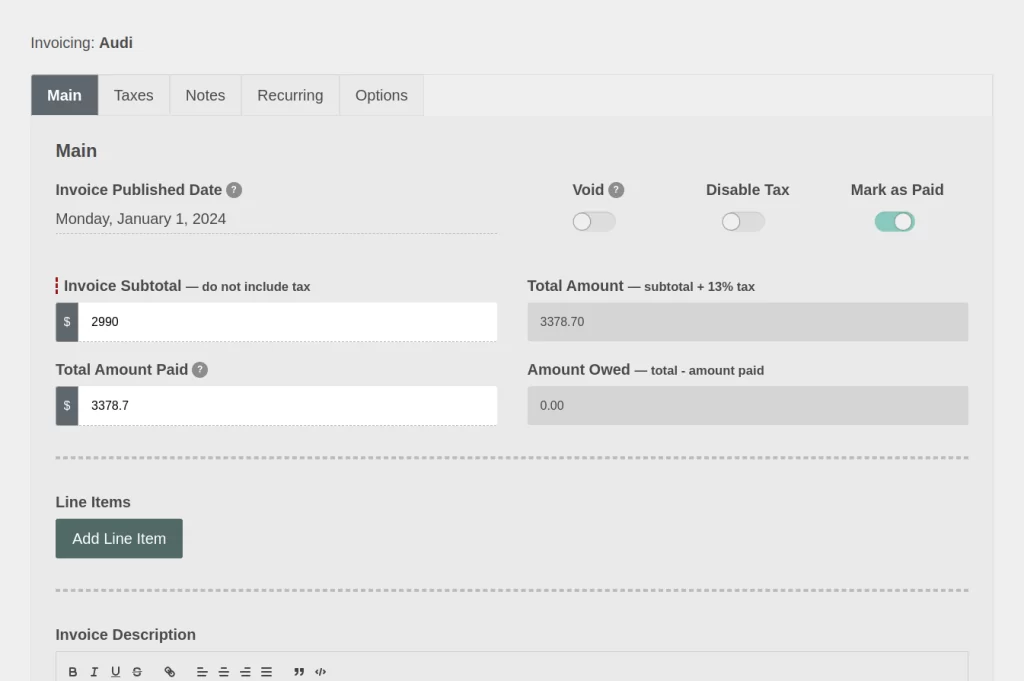
The main invoice tab contains the main information for you to fill out. Assuming you have the Default Taxes added to the Settings, HDInvoice will automatically fill out tax information and calculate the totals for you.
Invoice Published Date
This is the date that you want to publish the invoice. The publish date is visible on the invoice itself, and affects when the Invoice created notification is sent (if enabled, of course). You can set this to a future date to automatically schedule an invoice.
This field is for date only. Time is automatically set to “same time as now”. If you want to schedule for a specific time, you can use the Admin Custom Post Type (Invoices) tool.
Void
If the invoice should be cancelled, or is otherwise no longer payable, you can “void” the invoice. This will remove the ability to pay for it (if eCommerce), and will stop this invoice from being included in the stats and accounting views.
Disable Tax
Sometimes, you want to disable tax for the entire invoice. Enable this and tax calculations will be removed, regardless of what your other settings are.
Mark as Paid
This option will be automatically enabled when HDInvoice detects that an invoice has been fully paid. You can also enable it yourself and HDInvoice will update the Total Amount Paid field for you.
Invoice Subtotal
This is the ONLY required field.
If you have Tax Exclusive enabled in your settings, then the subtotal should be your invoice total excluding taxes. HDInvoice will automatically calculate the taxes and Total Amount for you.
If you have Tax Inclusive enabled, then you should enter the entire invoice total here (subtotal + taxes), and HDInvoice will take that value and calculate the Taxes, Invoice Subtotal, and Total Amount for you.
Total Amount
This field is readonly, meaning that it is automatically filled out for you and you cannot modify it. The Total Amount field is the final invoice value (subtotal + taxes) ⇾ the amount your customer needs to pay for the whole invoice.
Total Amount Paid
This field represents how much your customer has paid you so far. You can enter a partial amount here if needed. If the Total Amount Paid is the same or greater than the Total Amount field, the invoice is considered as “Paid”.
Amount Owed
This field represents how much is still owed on the invoice. Total Amount – Total Amount Paid.
Line Items
Line items can be used to add things like products or services to your invoice. Each line item requires a Line Item Name and a Line Item Value.
If at least one line item is present, a new label will become visible, showing you what the total value of all your lines items are. This can be used to see if your line item totals are the same as your Invoice Subtotal.
Invoice Description
This field allows you to add a custom description to your invoice.
Invoice — Taxes
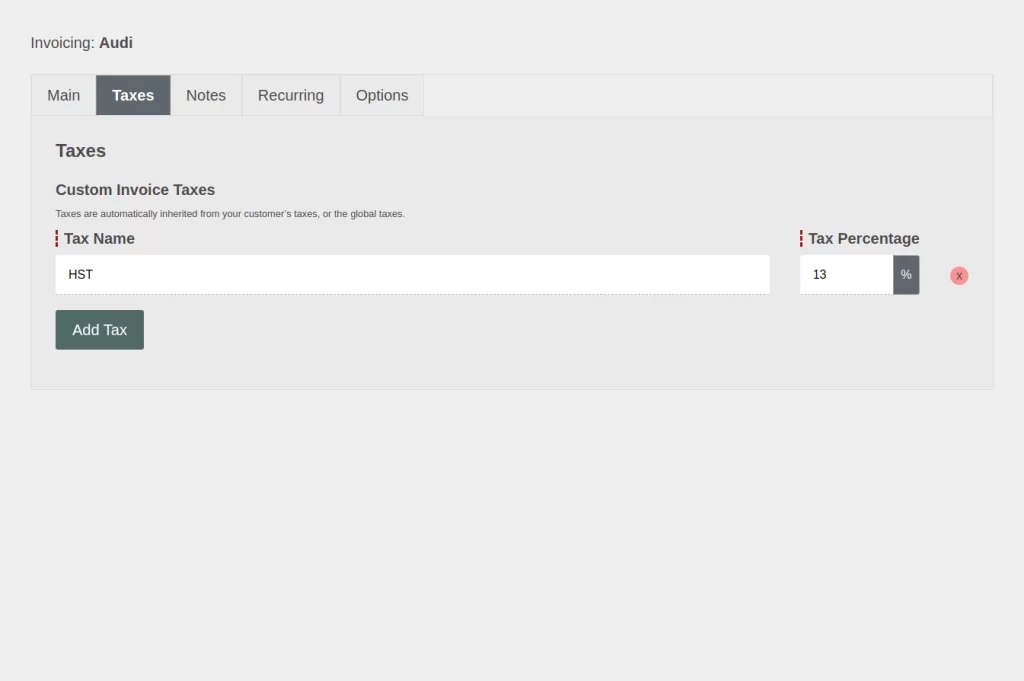
The Taxes tab allows you to control the taxes for the invoice. By default, this field will inherit the Default Taxes from your HDInvoice settings page, OR, the Default Taxes from your Customer if exists.
Each tax item requires a Tax Name and a Tax Percentage.
HDInvoice is not compatible with custom taxes for line items. Taxes apply to the entire invoice.
Invoice — Notes
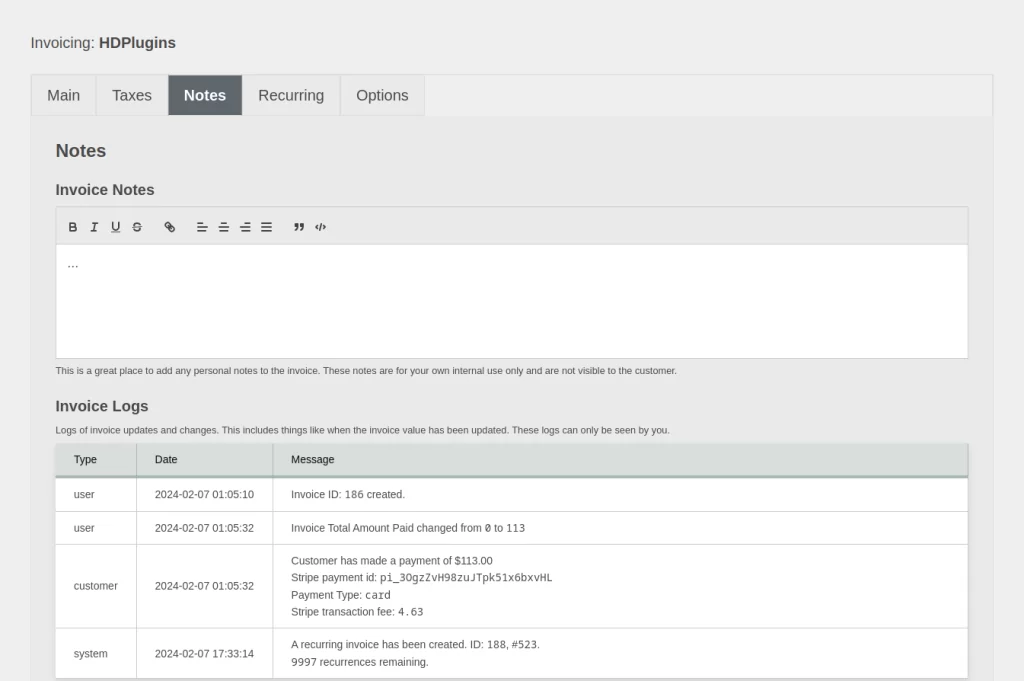
The Notes tab is where you can find extra “information” about this invoice. All data here is hidden from your customer and only visible to you.
Invoice Notes
This is where you can add any personal notes about this invoice. Things such as “Customer promises to pay by”, “This invoice does not include”, etc. This content is visible to you only.
Invoice Logs
HDInvoice creates logs for certain events. Events include things such as:
- When an invoice has been created
- When invoice totals change (subtotal, amount paid, etc)
- When invoice has been voided or marked as paid
- When customer has paid via eCommerce
- Depending on the Payment Gateway, will also include extra details such as the transaction ID, transaction fees, etc.
- Invoice viewed (if enabled in the HDInvoice settings)
Invoice — Recurring
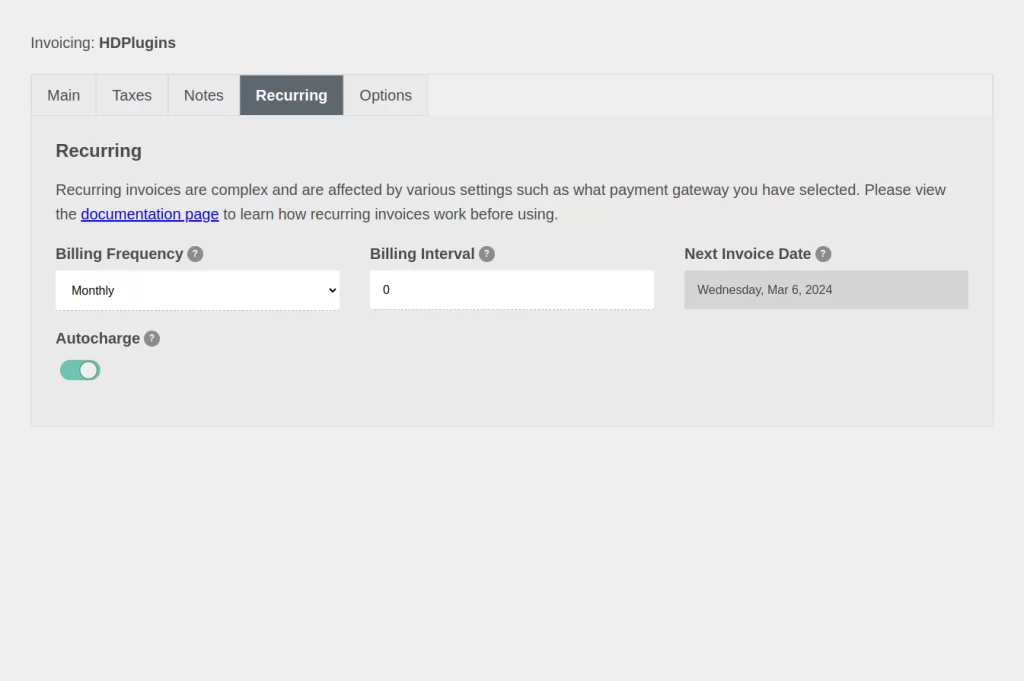
The Recurring tab is where you can control when and if this invoice should be automatically duplicated at a later date.
Only original “parent” invoices can be recurring. Duplicated “child” invoices inherit the recurring settings from their parent.
NOTE: WordPress, and thus HDInvoice, are not constantly running in the background of your server. No website is. Because of this, it is impossible for HDInvoice to guarantee that an invoice will recur at a specified date or time. Instead, invoices will be created the first time WordPress loads up after the recur datetime.
To ensure that invoices are always created on time, please read How to set up a cron for HDInvoice.
Billing Frequency
This sets when child invoices will be created. The available options are Weekly, Monthly, and Yearly -> more options coming in future updates. Set this option to - or blank to stop recurring.
NOTE: The recurring schedules work on a timer. For example, Monthly is a timer of 2592000 seconds (30 days). After that amount of seconds has passed, the invoice is ready to be duplicated. However, since not every month has the same number of days, this means that billing on the 5th of this month, does not mean that the next invoice will always be the 5th of next month.
Billing Interval
This designates how many invoices should be created. So if, for example, you want to create four monthly payments, enter 4 here and HDInvoice will create 3 child invoices.
You can set the field to 0 if you want this invoice to recur until you edit the parent invoice and change the Billing Frequency to “-“.
Autocharge
This option is disabled is you are not using a Payment Gateway that is compatible. Enable this, and HDInvoice will attempt to autocharge the customer whenever a child invoice is created.
Invoice — Options

The Options tab contains advanced options to help you control some HDInvoice features.
Disable eCommerce
Sometimes you want your invoices to be paid online, other times, you may prefer that they send you an eTransfer or pay in cache. Enable this feature and eCommerce will be disabled for this customer.
Do Not Send Customer Emails
If you have notifications enabled that send your customer, you can disable notifications on a per-invoice basis by enabling this settings. Especially useful if you want to send the invoice link to your customer yourself.
HDInvoice Tools
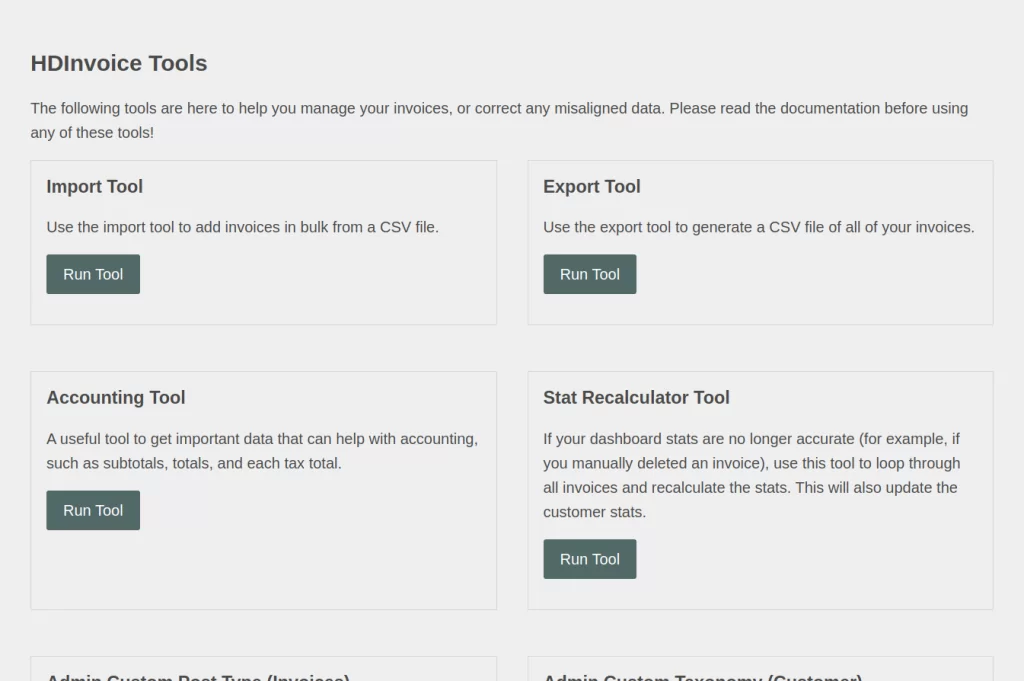
I have built in several tools to help you manage your invoices, or get data out that you may need. Tools can be found by going to the HDInvoice page and selecting Tools from the menu.
Import Tool
The import tool allows you to import invoices by upload a CSV file. It is YOUR responsibility to ensure that your CSV file is properly formatted before import.
The CSV file must not contain a “header” row. All rows must be invoice data.
The rows are, in order:
Required fields marked with an *
- Invoice Number ⇾ Must be an integer. Will be generated for you if not provided.
- Publish Date ⇾ Must be in format
YYYY-MM-DD. Will be set to “today” if not provided. - *Customer Name
- *Subtotal ⇾ Total – Tax
- *Total ⇾ Total + Tax
- Paid ⇾ Amount paid
- Taxes ⇾ JSON formatted string. Example JSON string:
[{"tax_name":"HST","tax_value":13}] - Line Items ⇾ JSON formatted string. Example JSON string:
[{"item_name":"1 year hosting","item_value":144}] - Description ⇾ Must be escaped HTML or plain text. Make sure you don’t have any
/ror/nas that will break CSV formatting.
Once you upload your CSV and “Start Import”, HDInvoice will upload each invoice one-by-one. It will check if there is an existing customer with the provided Customer Name, or create a new customer if one does not already exist.
NOTE: If you are having troubles with the importer, make damned sure your CSV is properly formatted. You can also use your browser console to get more debug stats such as helping track down what row is the one causing the problem.
Export Tool
The export tool allows you to export all invoices within the selected date range as a CSV file. The exported data contains the following columns for each invoice:
- Invoice Id ⇾ HDInvoice internal ID
- Invoice Parent ⇾ If child invoice (recurring), HDInvoice ID of the parent
- Invoice Number ⇾ The public invoice number
- Publish Date ⇾ Publish date in
YYYY-MM-DDformat - Customer Id ⇾ HDInvoice internal customer ID
- Customer Name ⇾ Customer name
- Subtotal ⇾ Invoice subtotal
- Total ⇾ Invoice total
- Paid ⇾ Amount paid
- Owed ⇾ Amount owed
- Transaction Fees ⇾ Total transaction fees (if eCommerce)
- Status ⇾ paid, unpaid, partial, void
- Taxes ⇾ JSON string of attached taxes
- Line Items ⇾ JSON string of line items
- Description ⇾ HTML escaped invoice description
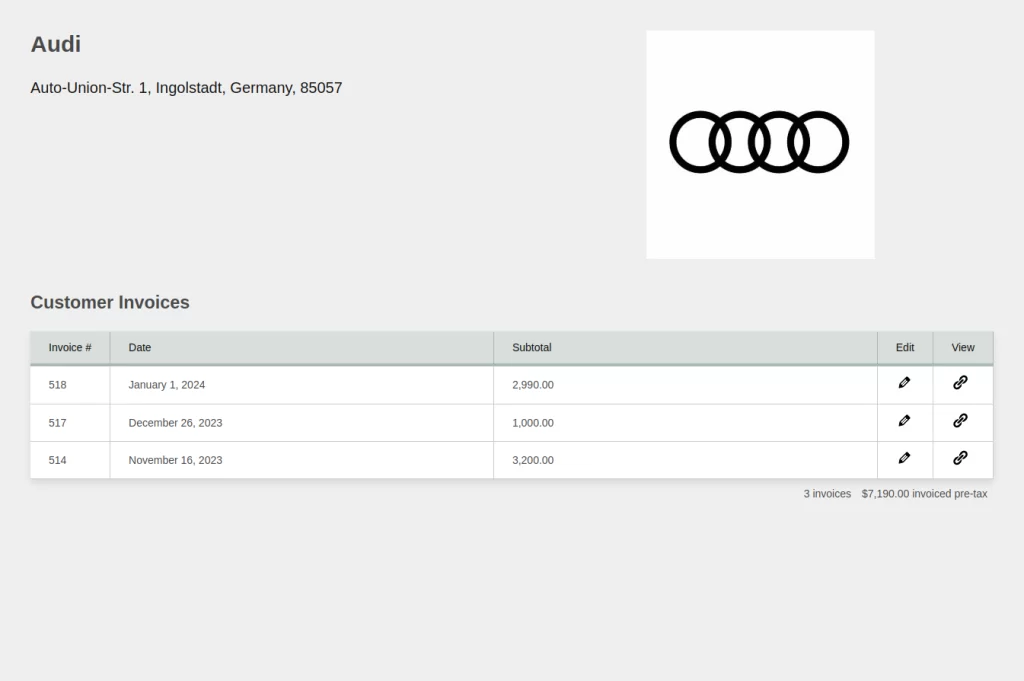
Accounting Tool
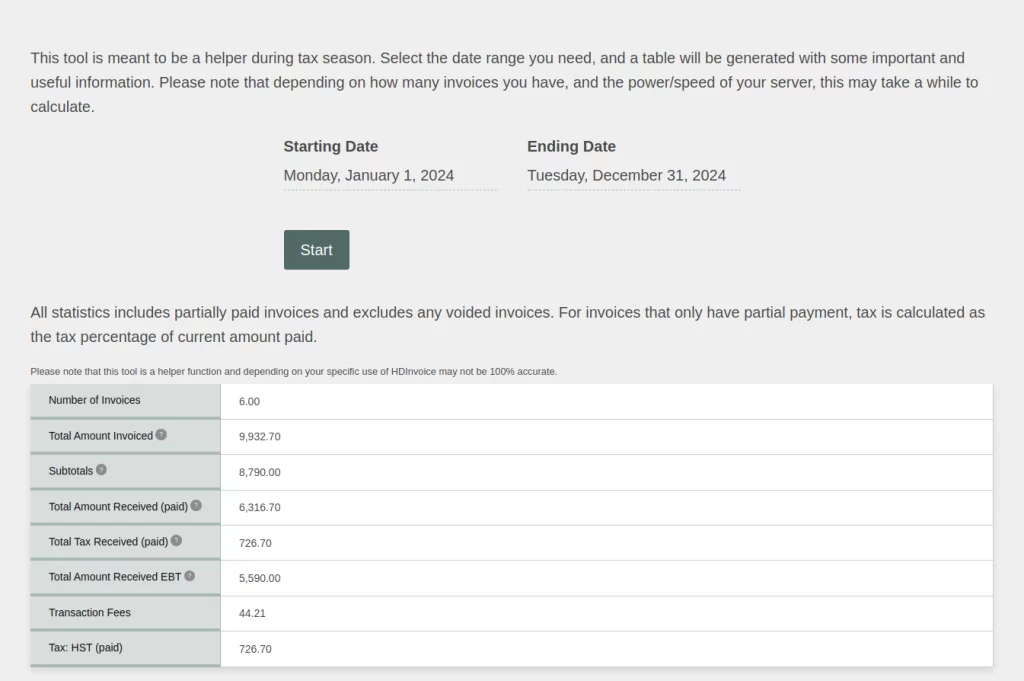
The accounting tool is a helper tool that displays various information based on all invoices within the selected date range. Useful during tax season!
The tool will provide a table with the following information:
- Number of invoices ⇾ total number of invoices created
- Total Amount Invoiced ⇾ How much all of your invoices are worth, including taxes
- Subtotals ⇾ Total excluding taxes
- Total Amount Received (paid) ⇾ How much you have been paid
- Total Tax Received (paid) ⇾ How much tax you have been paid
- Total Amount Received EBT ⇾ Earnings before tax. Total amount you’ve been paid excluding tax.
- Taxes (paid) ⇾ List of each individual tax received
- Transaction Fees ⇾ Total amount of transaction fees (eCommerce)
Stat Recalculator Tool
This tool will loop through all customers and invoices and recalculate the stats. You should run this tool after deleting an invoice or customer using any of the Admin tools.
If for whatever reason, your customer stats (customer page, customer value at the bottom of invoice table), or your dashboard stats are out of sync, you can run this tool.
Admin Custom Post Type (Invoices) Tool
If for whatever reason you need to delete an invoice, this tool will redirect you to a basic WordPress page that will list all of your invoices in a table. I also included a custom column called Invoice Data to make finding the particular invoice you need a little easier. Make sure to run the Stat Recalculator Tool after deleting any invoices.
Admin Custom Taxonomy (Customer) Tool
If for whatever reason, you need to delete a customer, this tool will redirect you to a basic WordPress page that will list all of your customers in a table. Please note that deleting a customer does NOT delete their attached invoices. You will need to use the Admin Custom Post Type (Invoices) Tool for that.
Additional Things to Know
How to set up a cron for HDInvoice
For the best experience using recurring invoices, I strongly recommend setting up a server cron (cronjob). Websites are not pieces of software constantly running in the background, but are instead dynamically generated on the fly every time a page is requested. Because of this, a website cannot run any tasks unless it is currently active. To solve this issue, you can use a server cron.
Crons tell your server to run a certain file at the designated time and interval. We can use this to tell your server to load up your site (and thus HDInvoice) every few hours to ensure that scheduled invoices are always created when needed.
HDInvoice has a custom rout yourdomain.com/wp-json/hdinvoice/wake-up and accessing this rout (URL) will load up your domain and return the following text “The beast has ended its slumber”. What we want to do is tell your server to access this rout every x hours.
The way to set up a cron differs depending on your hosting environment, so you may need to contact your host for support.
On most cPanel hosts, setting up this cron is as simple as logging into your cPanel, and navigating to “Cron Jobs”. From here you can create your custom cron!
You can set the times to whatever feels best for you, but I recommend the “Twice per Day” setting. The command should be:wget -O - https://yourdomain.com/wp-json/hdinvoice/wake-up >/dev/null 2>&1 of course replacing yourdomain.com with your actual domain.
Saving as PDF
There is currently no native way to save or export an invoice as a PDF. However, there are two important things to know.
- Dedicated PDF creation coming soon
- Your browser can already do this!
A little known secret is that most browsers (at least, Chromium based ones, Firefox, and even WebKit can. Unsure about Safari specifically) can create PDFs on the print screen ⇾ and HDInvoice has a custom print page that is perfect for this.
All you have to do is view the published invoice and click on the Print icon. This will open up your browser/OS’s print dialogue. From here, change your printer/destination to Save as PDF.
Developer Settings
If you are a developer, then HDInvoice will be a dream for you. I have built in many actions and filters to allow you to hook into most parts of HDInvoice and customize to your desire.
NOTE: This section is still under development and will continue to be fleshed out.
Change How Many Customers or Invoices per-page
HDInvoice paginates the Customers page and Invoices page to only show 50 at a time. You can override this by adding the following definition.
define("HDV_PER_PAGE", 50); setting 50 to your desired number.
Add custom content after invoice
You can use the hdv_after_invoice action to add a custom function or content to the end of invoices. This could be used to add additional tracking such as Google Analytics, custom thank you message, or anything else you can think of. The action takes a single argument invoice_id.
Change the Thank You message for paid invoices
If you want to change or customize the thank you message that appears on invoices once the invoice has been marked as paid, use the hdv_thank_you_message filter.
Upcoming Features and Enhancements
HDInvoice has only just recently launched, and even though it is already quite feature rich, I am going to continue working on and improving HDInvoice every chance I get. The following are features or enhancements that are going to be added (in no particular order).
Please let me know if any of the following are features that you really desire.
- Dedicated PDF generation ⇾ A new icon next to the print icon to automatically generate and download a PDF version of an invoice
- Ability to attach files to invoices ⇾ useful to attach images, PDFs, etc for client reference
- Product Management ⇾ Add a new Products section where you can add in all of your products. The invoice line-items will then use this list as hints to help autofill line-item names and values.
- Better Expense Management ⇾ Add line items for expenses. This will be hidden from your customer by default, but will be included in the Accounting Tool
- Webhooks ⇾ This is more of a developer thing. But for any devs using HDInvoice, webhooks allow you to integrate HDInvoice with, well, just about anything!
- HDCommerce and WooCommerce integration ⇾ Getting a new order will automatically create an invoice in HDInvoice as well.
- PWA ⇾ HDInvoice already works extremely well on mobile, but building it as a PWA lets you install in on your android phone as if it were a native app. This would also allow you to “cache” offline data.
- eCommerce Allow Refunds ⇾ Allow you to refund a invoice directly from within HDInvoice with compatible Payment Gateways
- Line-item Taxes ⇾ Currently, taxes are invoice-wide. This would allow you to set a custom tax rate per-line-item.
- More Billing Frequencies ⇾ Currently, HDInvoice has weekly, monthly, and yearly. I want to add in more like “twice a month”, “twice a year” etc.
- Filterable Invoice Numbers ⇾ HDInvoice Invoice Numbers are good ‘ol integers. Making it filterable allows developers to use their own generation function.
- Dashboard Chart Date Filter ⇾ Allow users to change the daterange of the dashboard charts.
- Translation Ready ⇾ For now, HDInvoice is in English only. But once it takes off, I’d love to open it up to more languages